Let say we wanted to upload images captured through our iOS app to the cloud, and we have chosen Cloudinary as the means to this. Let say we have chosen to build application using Swift, the new programming language released by Apple for building iOS applications.
You would think that we could just grab the Cloudinary SDK and get crackin right? right? right ?! Wrong!!
As Swift is yet to get good tooling for dependency management (Cocoapods tend not to work), there’s a few manual steps you have to perform. Let’s get coding!
Solution
Let’s pretend you have a RESTful service that returns you a list of items, whose properties include the URL of its associated image.
Let’s also pretend you already have the means to pick the desire image to be uploaded, either via a controller with an AlertController, or an intermediary page on which the user selects the image to be uploaded.
E.g. Using a controller with 2 button
import Foundation | |
import MobileCoreServices | |
import UIKit | |
class ImageCaptureController: UIViewController,UINavigationControllerDelegate, UIImagePickerControllerDelegate | |
{ | |
override func viewDidLoad() { | |
super.viewDidLoad() | |
} | |
var img:UIImage? | |
@IBAction func chooseFromCamera(sender: AnyObject) { | |
var imagePickerController = UIImagePickerController() | |
imagePickerController.delegate = self | |
imagePickerController.sourceType = UIImagePickerControllerSourceType.Camera | |
imagePickerController.allowsEditing = true | |
self.presentViewController(imagePickerController, animated: true, completion: { imageP in | |
}) | |
} | |
@IBAction func chooseFromGallery(sender: AnyObject) { | |
var imagePickerController = UIImagePickerController() | |
imagePickerController.delegate = self | |
imagePickerController.sourceType = UIImagePickerControllerSourceType.SavedPhotosAlbum | |
imagePickerController.allowsEditing = true | |
self.presentViewController(imagePickerController, animated: true, completion: { imageP in | |
}) | |
} | |
override func didReceiveMemoryWarning() { | |
super.didReceiveMemoryWarning() | |
// Dispose of any resources that can be recreated. | |
} | |
@IBAction func capture(sender : UIButton) { | |
if UIImagePickerController.isSourceTypeAvailable(UIImagePickerControllerSourceType.Camera){ | |
println("Button capture") | |
var imag = UIImagePickerController() | |
imag.delegate = self | |
imag.sourceType = UIImagePickerControllerSourceType.Camera; | |
imag.mediaTypes = [kUTTypeImage] | |
imag.allowsEditing = false | |
self.presentViewController(imag, animated: true, completion: nil) | |
} | |
} | |
func imagePickerController(picker: UIImagePickerController!, didFinishPickingImage image: UIImage!, editingInfo: NSDictionary!){ | |
img = image | |
self.dismissViewControllerAnimated(true, completion: { () -> Void in | |
}) | |
self.performSegueWithIdentifier("imageCaptured", sender:self) | |
} | |
override func prepareForSegue(segue: UIStoryboardSegue, sender: AnyObject!) { | |
if (segue.identifier == "imageCaptured") { | |
var svc = segue.destinationViewController as UploadViewController; | |
svc.setImage(img) | |
} | |
} | |
} |
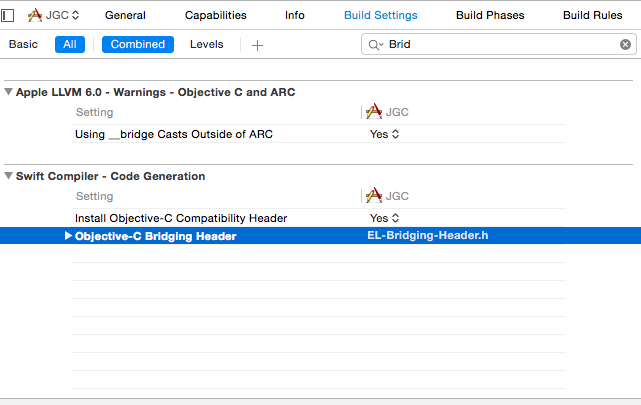
Upon completing the steps indicated in the cloudinary setup instructions, we can now add a Bridge header file and related wrapper classes written in oh so lovely Objective-C.
#ifndef EL_Bridging_Header_h | |
#define EL_Bridging_Header_h | |
#import "Cloudinary.h" | |
#endif |
Let’s tie it up in Xcode.
And finally, the last pieces to make it all work: the actual uploading.
//NOTE: written in older version of Swift back in January 2015. Swift has since changed a bit. | |
import Foundation | |
import UIKit | |
class UploadViewController: UIViewController,CLUploaderDelegate | |
{ | |
@IBOutlet weak var capturedImage: UIImageView! | |
var Cloudinary:CLCloudinary! | |
var image:UIImage? | |
override func viewDidLoad() { | |
super.viewDidLoad() | |
capturedImage.image = image | |
Cloudinary = CLCloudinary(url: "cloudinary://yours:yours") | |
} | |
override func didReceiveMemoryWarning() { | |
super.didReceiveMemoryWarning() | |
// Dispose of any resources that can be recreated. | |
} | |
@IBAction func uploadItem(sender: AnyObject) { | |
let fileId = "YOUR/FILE/ID" | |
uploadToCloudinary(fileId) | |
} | |
func uploadDetailsToServer(fileId:String){ | |
//upload your metadata to your rest endpoint | |
} | |
func uploadToCloudinary(fileId:String){ | |
let forUpload = UIImagePNGRepresentation(self.image) as NSData | |
let uploader = CLUploader(Cloudinary, delegate: self) | |
uploader.upload(forUpload, options: ["public_id":fileId], | |
withCompletion:onCloudinaryCompletion, andProgress:onCloudinaryProgress) | |
} | |
func onCloudinaryCompletion(successResult:[NSObject : AnyObject]!, errorResult:String!, code:Int, idContext:AnyObject!) { | |
let fileId = successResult["public_id"] as String | |
uploadDetailsToServer(fileId) | |
} | |
func onCloudinaryProgress(bytesWritten:Int, totalBytesWritten:Int, totalBytesExpectedToWrite:Int, idContext:AnyObject!) { | |
//do any progress update you may need | |
} | |
func setImage(img:UIImage!){ | |
image = img | |
} | |
} | |
Voila!
UPDATE 6/22/15: Removed adapter code
Please keep in mind that I am not using the most secure way of uploading the file using cloudinary since i am keeping the api_secret on the mobile device. It can be easily changed following the steps highlighted here
Happy coding!